How to set up and install OXY-LC Interface Electronics with SST's Zirconia O2 Probe?
To operate a zirconia O2 probe, it is necessary to have interface electronics to power and control the sensors. For customers that do not want to purchase the electronics from SST, please read our application note on how to design your own interface electronics.
In this article, we will cover the following;
- Product overview – what each pin connection is for
- Installation and initial start-up – step by step procedure on how to install an SST O2 probe with the OXY-LC Interface Electronics
- Mounting instructions – where is best to mount the O2 probe and interface board in your application
- what to expect when you connect the O2 probe and interface board
Product Overview
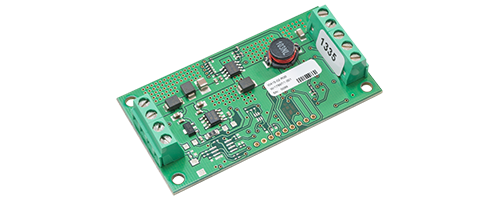
Here is an OXY-LC Interface Board. At the right-hand side of this board you will see 5 pin connections, numbered 1 to 5, these are where the sensor wires will be connected.
At the left-hand side of the board, there are an additional 4 pins, numbered 6 to 9. Pins 6 and 7 are for power supply connections, and pins 8 and 9 are for analogue output connections.

Installation and Initial Start-up
To ensure the best performance the best performance from your O2 probe and interface board, it must be installed correctly. Always handle the interface board using the correct ESD handling precautions.
Step 1 – Install the O2 probe in your application
During installation, to prevent contamination and poisoning the following must be considered;
- Ensure your hands are clean
- No silicone-based sealants can be near the sensor probe
- PTFE tape can be used
- Use correct O-ring type if applicable
Step 2 – Connect O2 sensor, OXY-LC and host controller or measurement
When connecting the sensor and board, to prevent electrical damage and mechanical damage, the following must be considered;
- Ensure all power is off
- Use the correct screwdriver size
- ESD protection
- Use the correct mounting screw size
- Ensure the correct tightening of screw terminals are used
- Make ground connections first
Step 3 – check installation
It is necessary to complete the following BEFORE switching the system ON for the first time;
- Ensure compliance with permissible installation position
- Verify the device is mounted securely and correctly
- Verify the device and wiring are all undamaged
- Ensure the cables are strain-free and not twisted
- Ensure the device is connected properly with all its inputs and outputs complete. All screw terminals are properly tightened.
- Check all connections for; correct colours/voltages; ensure there is a good mechanical connection and that the supply voltage is correct to prevent any electrical or mechanical damage
Step 4 – Power on
Apply a 24VDC power supply and test the power supply to ensure it is delivering the correct voltage before wiring the device. Failure to do so BEFORE first power on could result in irreversible product damage that is NOT covered by warranty.
When the device is initially powered on, the status of the sensor and board should read the following; communication OK, supply current is normal (<1A) and there is a valid O2% reading after 1 minute.
Step 5 – Test
During test, you should expect to see the following readings from each output;
- O2% should read between 15 to 25% O2
- Modbus output should read between 1500 to 2500
- 0-10V output should read between 6 to10V
- 4-20mA should read between 13.6 to 20mA
If a fault it detected, an error code is displayed (RS485 variant), or the analogue output will remain at 4mA or 0V.
Mounting

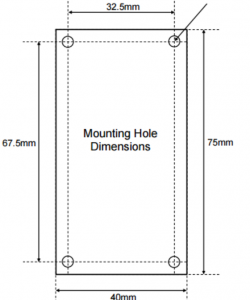
SST recommend housing the interface board in a suitable enclosure to protect from damage. The interface must be securely fitted to a suitable mounting surface using the mounting holes provided. Protect the interface from accidental shocks or vibrations as this may damage the board.
For more information on how to install and set up SST’s zirconia oxygen sensors and interface boards, please contact click on the contact buttons below to speak to one of our technical support team.
